This post was last updated on: 17th of June, 2023
If you’re like me and you like to customize your setups, then you may or may not have considered running GitLab in a Docker container, but behind a separate NGINX, because let’s face it:
Most of us already have a working NGINX available. Why not use it?
Dockerzied GitLab comes bundled with its own NGINX that is supposed to proxy any and all request made to it and it also has Lets Encrypt support, but what if you’ve already got your own NGINX running? What if the NGINX you’re already running has features which GitLab’s doesn’t? There must be a way to setup GitLab in a Docker container running behind your already existing NGINX, right?
(If I write NGINX one more time! 😀 )
In this blog post we are going to run through the configuration for GitLab, your NGINX and how to configure a GitLab Runner so you can run your CI/CD pipelines and jobs.
At the end of this blog post, you’ll have
- SSL certificates with Let’s Encrypt
- NGINX reverse proxy to serve your Docker containers to the web
- Your very own GitLab instance
- GitLabs Docker Container Registry
- GitLab Pages
- GitLab Runner for your CI/CD pipelines and jobs
- GitLab release automation following conventional commits
- Publish build results to GitLabs Package Registry
- Attach links to assets from the Package Registry to releases
- Docker multiarch images by manifest manipulation and by using buildx
- RenovateBot dependency checker and updater
- Deployments to GitLab pages
- GitLab CI jobs for NodeJS, Gradle and Docker
- “Mirror” releases on GitHub
So strap in. It’s going to be a long ride.
Preface
Everything in this post was written by using:
– Ubuntu 20.04 LTS
– Docker version 20.10.7
– Architecture amd64
– Text editor Nano
This blog posts assumes you’ve got knowledge in:
- NGINX
- Docker
- Working with the command line
- Git and GitHub/Git repositories
and you having - A-Records for YOUR-DOMAIN.TLD:
- gitlab.YOUR-DOMAIN.TLD pointing at our server
- pages.YOUR-DOMAIN.TLD pointing at our server
- *.pages.YOUR-DOMAIN.TLD pointing at our server
- registry.YOUR-DOMAIN.TLD pointing at our server
- a working mail server to login to from other applications
- a server or virtual private server with full control over which is accessible from the internet
- a GitHub account and a personal access token with at least
- full repo scope
- workflow scope
- write and read packages scope
- a DockerHub account and a personal access token
- lots of spare time and the drive to tinker
Table Of Contents
docker-compose.yml
Create a new directory in your users home directory: mkdir ~/gitlab
and create our docker-compose.yml file: touch ~/gitlab/docker-compose.yml
Now open it with your favourite editor and add
version: '3'
services:
GitLab
for our GitLab container, add the following to your docker-compose.yml:
###### GITLAB ######
  gitlab:
    container_name: gitlab
    image: gitlab/gitlab-ce:16.0.5-ce.0
    # Check https://hub.docker.com/r/gitlab/gitlab-ce/tags?page=1&ordering=last_updated for newer versions!
    restart: unless-stopped
    environment:
      GITLAB_SHELL_SSH_PORT: 4242
      GITLAB_OMNIBUS_CONFIG: |
        # GENERAL
        external_url 'https://gitlab.YOUR-DOMAIN.TLD'
        gitlab_rails['gitlab_shell_ssh_port'] = 4242
        gitlab_rails['lfs_enabled'] = true
        gitlab_rails['gitlab_default_theme'] = 11
        gitlab_rails['time_zone'] = 'Europe/Berlin'
        gitlab_rails['gitlab_username_changing_enabled'] = false
        gitaly['pack_objects_cache_enabled'] = true
        alertmanager['enable'] = false
        prometheus['enable'] = false
        prometheus_monitoring['enable'] = false
        # GITLAB CONTAINER REGISTRY
        gitlab_rails['registry_enabled'] = true
        registry_external_url 'https://registry.YOUR-DOMAIN.TLD'
        registry['registry_http_addr'] = "gitlab:5000"
        registry_nginx['ssl_certificate'] = "/le-ssl/letsencrypt/live/YOUR-DOMAIN.TLD/fullchain.pem"
        registry_nginx['ssl_certificate_key'] = "/le-ssl/letsencrypt/live/YOUR-DOMAIN.TLD/privkey.pem"
        # GITLAB PAGES
        pages_external_url "https://pages.YOUR-DOMAIN.TLD/"
        gitlab_pages['enable'] = true
        gitlab_pages['external_http'] = []
        gitlab_pages['external_https'] = []
        gitlab_pages['listen_proxy'] = "0.0.0.0:8090"
        gitlab_pages['inplace_chroot'] = true
        gitlab_pages['gitlab_server'] = 'http://gitlab.YOUR-DOMAIN.TLD'
        pages_nginx['enable'] = true
        pages_nginx['listen_https'] = true
        pages_nginx['redirect_http_to_https'] = true
        pages_nginx['ssl_certificate'] = "/le-ssl/letsencrypt/live/YOUR-DOMAIN.TLD/fullchain.pem"
        pages_nginx['ssl_certificate_key'] = "/le-ssl/letsencrypt/live/YOUR-DOMAIN.TLD/privkey.pem"
        # EMAIL
        gitlab_rails['gitlab_email_enabled'] = true
        gitlab_rails['gitlab_email_from'] = 'gitlab@YOUR-DOMAIN.TLD'
        gitlab_rails['gitlab_email_display_name'] = 'GitLab'
        ## SMTP Outgoing Mail
        gitlab_rails['smtp_enable'] = true
        gitlab_rails['smtp_address'] = "smtp.gmail.com"
        gitlab_rails['smtp_port'] = 587
        gitlab_rails['smtp_user_name'] = "gitlab-YOUR-DOMAIN@gmail.com"
        gitlab_rails['smtp_password'] = "******"
        gitlab_rails['smtp_domain'] = "smtp.gmail.com"
        gitlab_rails['smtp_authentication'] = "login"
        gitlab_rails['smtp_enable_starttls_auto'] = true
        gitlab_rails['smtp_tls'] = false
        gitlab_rails['smtp_openssl_verify_mode'] = 'peer'
        ## IMAP Incoming Mail
        gitlab_rails['incoming_email_enabled'] = true
        gitlab_rails['incoming_email_address'] = "gitlab-YOUR-DOMAIN+%{key}@gmail.com"
        gitlab_rails['incoming_email_email'] = "gitlab-YOUR-DOMAIN@gmail.com"
        gitlab_rails['incoming_email_password'] = "******"
        gitlab_rails['incoming_email_host'] = "imap.gmail.com"
        gitlab_rails['incoming_email_port'] = 993
        gitlab_rails['incoming_email_ssl'] = true
        gitlab_rails['incoming_email_start_tls'] = false
        gitlab_rails['incoming_email_mailbox_name'] = "inbox"
        gitlab_rails['incoming_email_idle_timeout'] = 60
        gitlab_rails['incoming_email_expunge_deleted'] = true
        # GITLAB PROXY
        letsencrypt['enabled'] = false
        gitlab_rails['trusted_proxies'] = ['172.18.0.0/16','172.17.0.0/16','YOUR.SERVER.IP.ADDRESS']
        nginx['real_ip_trusted_addresses'] = ['172.18.0.0/16','172.17.0.0/16','YOUR.SERVER.IP.ADDRESS']
        nginx['real_ip_header'] = 'X-Real-IP'
        nginx['listen_port'] = 80
        nginx['listen_https'] = false
        nginx['ssl_certificate'] = "/le-ssl/letsencrypt/live/YOUR-DOMAIN.TLD/fullchain.pem"
        nginx['ssl_certificate_key'] = "/le-ssl/letsencrypt/live/YOUR-DOMAIN.TLD/privkey.pem"
    networks:
      - default
    ports:
      - "4242:22"
    volumes:
      - ./services/gitlab/config:/etc/gitlab
      - ./services/gitlab/logs:/var/log/gitlab
      - ./services/gitlab/data:/var/opt/gitlab
      - ./swag/config/etc:/le-ssl
Now, that’s a lot of configs!
Go through each line one by one.
– Replace every occurence of YOUR-DOMAIN.TLD or YOUR-DOMAIN with your domain.
– Change the settings for the EMAIL section.
– Replace YOUR.SERVER.IP.ADDRESS with your servers actual external IP.
– Check the 172.18-IP address by inspecting your default network with ‘docker network inspect default’ and replace the IP address in your GitLab config if necessary, or add additional ones.
As far as the GitLab container is concerned, it’s done. You may need to change the configuration paramteres regarding SMTP settings to suit your needs as it can be different for some providers. Check the GitLab template config to see which configuration parameters suit your need.
Don’t start anything yet, it won’t work. Our docker-compose is still incomplete.
If you don’t have your own mail server running somewhere, I suggest checking your mail provider for any login data that may be suitable for use here. You will need mail communication for GitLab for admin confirmation, password reset requests and so on and so forth. I read somewhere that it is possible to use GMail for such purposes, but I haven’t the faintest how and it’s not the topic of this post.
NGINX
For our NGINX container, add the following to your docker-compose.yml:
###### NGINX ######
  swag:
    image: ghcr.io/linuxserver/swag:2.6.0
    container_name: swag
    restart: unless-stopped
    cap_add:
      - NET_ADMIN
    ports:
      - 443:443
      - 80:80
    volumes:
      - ./swag/config:/config
    environment:
      - PUID=1000
      - PGID=1000
      - TZ=Europe/Berlin
      - URL=YOUR-DOMAIN.TLD
      - SUBDOMAINS=gitlab,registry,pages,!!!THIS-WILL-BE-EXPANDED-ON-IN-A-LATER-CHAPTER!!!
      - VALIDATION=http
      - EMAIL=encrypt@YOUR-DOMAIN.TLD
      - STAGING=false
      - DOCKER_MODS=linuxserver/mods:swag-ffmpeg|linuxserver/mods:swag-imagemagick|linuxserver/mods:swag-auto-reload|linuxserver/mods:swag-ioncube
We are using Linuxserver.io’s SWAG as our NGINX. Make sure to check their documentation on whether or not they support DNS validation for your domain provider. If they do, you’ll have an easy life setting up a wildcard certificate. If you’re like me, you don’t.
This assumes that you do not have the possibility of DNS validation and as such, can not create wildcart certificates with Let’s Encrypt. THAT means that you will need to expand the SUBDOMAIN variable with your subdomains should you add any more users or groups to your GitLab instance.
Replace PUID and PGID with the user ID and group ID of your server user who’s going to run the docker-compose.yml. Replace the TZ variable with your own timezone, if need be. Set URL to your top domain. Set EMAIL to one of your emails where you’d like to recieve notifications if any certificate for your NGINX is about to expire.
Our docker-compose is complete and should look similar to this:
version: '3'
services:
###### NGINX ######
  swag:
    image: ghcr.io/linuxserver/swag:2.6.0
    container_name: swag
    restart: unless-stopped
    cap_add:
      - NET_ADMIN
    ports:
      - 443:443
      - 80:80
    volumes:
      - ./swag/config:/config
    environment:
      - PUID=1000
      - PGID=1000
      - TZ=Europe/Berlin
      - URL=YOUR-DOMAIN.TLD
      - SUBDOMAINS=gitlab,registry,pages,!!!THIS-WILL-BE-EXPANDED-ON-IN-A-LATER-CHAPTER!!!
      - VALIDATION=http
      - EMAIL=encrypt@YOUR-DOMAIN.TLD
      - STAGING=false
      - DOCKER_MODS=linuxserver/mods:swag-ffmpeg|linuxserver/mods:swag-imagemagick|linuxserver/mods:swag-auto-reload|linuxserver/mods:swag-ioncube

###### GITLAB ######
  gitlab:
    container_name: gitlab
    image: gitlab/gitlab-ce:16.0.5-ce.0
    # Check https://hub.docker.com/r/gitlab/gitlab-ce/tags?page=1&ordering=last_updated for newer versions!
    restart: unless-stopped
    environment:
      GITLAB_SHELL_SSH_PORT: 4242
      GITLAB_OMNIBUS_CONFIG: |
        # GENERAL
        external_url 'https://gitlab.YOUR-DOMAIN.TLD'
        gitlab_rails['gitlab_shell_ssh_port'] = 4242
        gitlab_rails['lfs_enabled'] = true
        gitlab_rails['gitlab_default_theme'] = 11
        gitlab_rails['time_zone'] = 'Europe/Berlin'
        gitlab_rails['gitlab_username_changing_enabled'] = false
        gitaly['pack_objects_cache_enabled'] = true
        alertmanager['enable'] = false
        prometheus['enable'] = false
        prometheus_monitoring['enable'] = false
        # GITLAB CONTAINER REGISTRY
        gitlab_rails['registry_enabled'] = true
        registry_external_url 'https://registry.YOUR-DOMAIN.TLD'
        registry['registry_http_addr'] = "gitlab:5000"
        registry_nginx['ssl_certificate'] = "/le-ssl/letsencrypt/live/YOUR-DOMAIN.TLD/fullchain.pem"
        registry_nginx['ssl_certificate_key'] = "/le-ssl/letsencrypt/live/YOUR-DOMAIN.TLD/privkey.pem"
        # GITLAB PAGES
        pages_external_url "https://pages.YOUR-DOMAIN.TLD/"
        gitlab_pages['enable'] = true
        gitlab_pages['external_http'] = []
        gitlab_pages['external_https'] = []
        gitlab_pages['listen_proxy'] = "0.0.0.0:8090"
        gitlab_pages['inplace_chroot'] = true
        gitlab_pages['gitlab_server'] = 'http://gitlab.YOUR-DOMAIN.TLD'
        pages_nginx['enable'] = true
        pages_nginx['listen_https'] = true
        pages_nginx['redirect_http_to_https'] = true
        pages_nginx['ssl_certificate'] = "/le-ssl/letsencrypt/live/YOUR-DOMAIN.TLD/fullchain.pem"
        pages_nginx['ssl_certificate_key'] = "/le-ssl/letsencrypt/live/YOUR-DOMAIN.TLD/privkey.pem"
        # EMAIL
        gitlab_rails['gitlab_email_enabled'] = true
        gitlab_rails['gitlab_email_from'] = 'gitlab@YOUR-DOMAIN.TLD'
        gitlab_rails['gitlab_email_display_name'] = 'GitLab'
        ## SMTP Outgoing Mail
        gitlab_rails['smtp_enable'] = true
        gitlab_rails['smtp_address'] = "smtp.gmail.com"
        gitlab_rails['smtp_port'] = 587
        gitlab_rails['smtp_user_name'] = "gitlab-YOUR-DOMAIN@gmail.com"
        gitlab_rails['smtp_password'] = "******"
        gitlab_rails['smtp_domain'] = "smtp.gmail.com"
        gitlab_rails['smtp_authentication'] = "login"
        gitlab_rails['smtp_enable_starttls_auto'] = true
        gitlab_rails['smtp_tls'] = false
        gitlab_rails['smtp_openssl_verify_mode'] = 'peer'
        ## IMAP Incoming Mail
        gitlab_rails['incoming_email_enabled'] = true
        gitlab_rails['incoming_email_address'] = "gitlab-YOUR-DOMAIN+%{key}@gmail.com"
        gitlab_rails['incoming_email_email'] = "gitlab-YOUR-DOMAIN@gmail.com"
        gitlab_rails['incoming_email_password'] = "******"
        gitlab_rails['incoming_email_host'] = "imap.gmail.com"
        gitlab_rails['incoming_email_port'] = 993
        gitlab_rails['incoming_email_ssl'] = true
        gitlab_rails['incoming_email_start_tls'] = false
        gitlab_rails['incoming_email_mailbox_name'] = "inbox"
        gitlab_rails['incoming_email_idle_timeout'] = 60
        gitlab_rails['incoming_email_expunge_deleted'] = true
        # GITLAB PROXY
        letsencrypt['enabled'] = false
        gitlab_rails['trusted_proxies'] = ['172.18.0.0/16','172.17.0.0/16','YOUR.SERVER.IP.ADDRESS']
        nginx['real_ip_trusted_addresses'] = ['172.18.0.0/16','172.17.0.0/16','YOUR.SERVER.IP.ADDRESS']
        nginx['real_ip_header'] = 'X-Real-IP'
        nginx['listen_port'] = 80
        nginx['listen_https'] = false
        nginx['ssl_certificate'] = "/le-ssl/letsencrypt/live/YOUR-DOMAIN.TLD/fullchain.pem"
        nginx['ssl_certificate_key'] = "/le-ssl/letsencrypt/live/YOUR-DOMAIN.TLD/privkey.pem"
    networks:
      - default
    ports:
      - "4242:22"
    volumes:
      - ./services/gitlab/config:/etc/gitlab
      - ./services/gitlab/logs:/var/log/gitlab
      - ./services/gitlab/data:/var/opt/gitlab
      - ./swag/config/etc:/le-ssl
When you’re sure you’ve done everything right, change into your gitlab directory and run: docker-compose up -d swag
This will download the SWAG Docker image and start the container. GitLab will have to wait a little longer. SWAG will create all the default files and folders which we will now be expanding on.
NGINX
In order to route traffic and requests to our GitLab instance and GitLab registry as well as Pages, we need to tell our NGINX what should be routed where, depending on what’s being requested.
We will use Nano for making our proxy confs in this example.
GitLab
Create, edit and copy the following codeblock to our GitLab proxy config: `nano ~/gitlab/swag/config/nginx/site-confs/gitlab.subdomain.conf
server {
    listen 443 ssl;
    listen [::]:443 ssl;

    server_name gitlab.*;

    include /config/nginx/ssl.conf;

    client_max_body_size 0;

    # enable for ldap auth, fill in ldap details in ldap.conf
    #include /config/nginx/ldap.conf;

    # enable for Authelia
    #include /config/nginx/authelia-server.conf;

    location / {
        # enable the next two lines for http auth
        #auth_basic "Restricted";
        #auth_basic_user_file /config/nginx/.htpasswd;

        # enable the next two lines for ldap auth, also customize and enable ldap.conf in the default conf
        #auth_request /auth;
        #error_page 401 =200 /ldaplogin;

        # enable for Authelia
        #include /config/nginx/authelia-location.conf;

        include /config/nginx/proxy.conf;
        resolver 127.0.0.11 valid=30s;

        set $upstream_app gitlab;
        set $upstream_port 80;
        set $upstream_proto http;

        proxy_pass $upstream_proto://$upstream_app:$upstream_port;
    }
}
Save and exit Nano. SWAG now knows where to route any requests made to gitlab.your-domain.tld!
GitLab-Pages
Create, edit and copy the following codeblock to our GitLab Pages proxy config: `nano ~/gitlab/swag/config/nginx/site-confs/gitlab-pages.subdomain.conf
server {
    listen 443 ssl;
    listen [::]:443 ssl;

    server_name pages.*;

    include /config/nginx/ssl.conf;

    client_max_body_size 0;

    # enable for ldap auth, fill in ldap details in ldap.conf
    #include /config/nginx/ldap.conf;

    # enable for Authelia
    #include /config/nginx/authelia-server.conf;

    location / {
        # enable the next two lines for http auth
        #auth_basic "Restricted";
        #auth_basic_user_file /config/nginx/.htpasswd;

        # enable the next two lines for ldap auth, also customize and enable ldap.conf in the default conf
        #auth_request /auth;
        #error_page 401 =200 /ldaplogin;

        # enable for Authelia
        #include /config/nginx/authelia-location.conf;

        include /config/nginx/proxy.conf;
        resolver 127.0.0.11 valid=30s;

        proxy_set_header Connection         $connection_upgrade;
        proxy_set_header Upgrade            $http_upgrade;
        proxy_set_header X-Forwarded-Proto  $scheme;
        proxy_set_header X-NginX-Proxy      true;
        proxy_set_header X-Real-IP          $remote_addr;
        proxy_set_header X-Forwarded-For    $proxy_add_x_forwarded_for;

        set $upstream_app gitlab;
        set $upstream_port 8090;
        set $upstream_proto http;

        proxy_pass $upstream_proto://$upstream_app:$upstream_port;
    }
}
Save and exit Nano. SWAG now knows where to route any requests made to pages.your-domain.tld!
GitLab-Pages wildcard
Create, edit and copy the following codeblock to our GitLab Pages wildcard proxy config: `nano ~/gitlab/swag/config/nginx/site-confs/gitlab-pages-wildcard.subdomain.conf
server {
    listen 443 ssl;
    listen [::]:443 ssl;

    server_name *.pages.YOUR_DOMAIN.TLD;

    include /config/nginx/ssl.conf;

    client_max_body_size 0;

    # enable for ldap auth, fill in ldap details in ldap.conf
    #include /config/nginx/ldap.conf;

    # enable for Authelia
    #include /config/nginx/authelia-server.conf;

    location / {
        # enable the next two lines for http auth
        #auth_basic "Restricted";
        #auth_basic_user_file /config/nginx/.htpasswd;

        # enable the next two lines for ldap auth, also customize and enable ldap.conf in the default conf
        #auth_request /auth;
        #error_page 401 =200 /ldaplogin;

        # enable for Authelia
        #include /config/nginx/authelia-location.conf;

        include /config/nginx/proxy.conf;
        resolver 127.0.0.11 valid=30s;

        proxy_set_header Connection         $connection_upgrade;
        proxy_set_header Upgrade            $http_upgrade;
        proxy_set_header X-Forwarded-Proto  $scheme;
        proxy_set_header X-NginX-Proxy      true;
        proxy_set_header X-Real-IP          $remote_addr;
        proxy_set_header X-Forwarded-For    $proxy_add_x_forwarded_for;

        set $upstream_app gitlab;
        set $upstream_port 8090;
        set $upstream_proto http;

        proxy_pass $upstream_proto://$upstream_app:$upstream_port;
    }
}
Save and exit Nano. SWAG now knows where to route any requests made to any subdomain of pages.your-domain.tld!
Gitlab Registry
Create, edit and copy the following codeblock to our GitLab Registry proxy config: `nano ~/gitlab/swag/config/nginx/site-confs/gitlab-registry.conf
server {
    listen 443 ssl;
    listen [::]:443 ssl;

    server_name registry.*;

    include /config/nginx/ssl.conf;

    client_max_body_size 0;

    # enable for ldap auth, fill in ldap details in ldap.conf
    #include /config/nginx/ldap.conf;

    # enable for Authelia
    #include /config/nginx/authelia-server.conf;

    location / {
        # enable the next two lines for http auth
        #auth_basic "Restricted";
        #auth_basic_user_file /config/nginx/.htpasswd;

        # enable the next two lines for ldap auth, also customize and enable ldap.conf in the default conf
        #auth_request /auth;
        #error_page 401 =200 /ldaplogin;

        # enable for Authelia
        #include /config/nginx/authelia-location.conf;

        include /config/nginx/proxy.conf;
        resolver 127.0.0.11 valid=30s;

        proxy_set_header Connection         $connection_upgrade;
        proxy_set_header Upgrade            $http_upgrade;
        proxy_set_header X-NginX-Proxy      true;
        proxy_set_header X-Forwarded-Server $host;
        proxy_set_header X-Forwarded-For    $proxy_add_x_forwarded_for;
        proxy_set_header X-Forwarded-Proto  $scheme;

        set $upstream_app gitlab;
        set $upstream_port 5000;
        set $upstream_proto http;

        proxy_pass $upstream_proto://$upstream_app:$upstream_port;
    }
}
Save and exit Nano. SWAG now knows where to route any requests made to registry.your-domain.tld!
When you’re done setting up all these proxy confs, restart SWAG to make absolutely sure every config is loaded: docker restart swag
GitLab
Starting GitLab
This is where the fun begins. Open your browser and go to gitlab.your-domain.tld. Obviously, as GitLab has not yet been started, we’ll not get anywhere meaningfull yet. We’re preparing for running the initial setup for GitLab, which is done in the browser.
When GitLab is created, you need to enter a password for the root account which will function as your superuser for your GitLab instance. Have a password ready.
ALTERNATIVELY: You can also set the inital root password in our GitLab container settings. I advise against this, as you’d then have your root user’s password store in clear text in a file, just laying there, waiting to be read by anyone. Not good practice…but, if you want to make sure noone gets to configure it before you do, you might as well. Add the following to your GitLab config, right below
GITLAB_OMNIBUS_CONFIG: |
        # General
Of course, change “password” to a value of your liking.
gitlab_rails['initial_root_password'] = "password"For further reading from the GitLab config template:
Change the initial default admin password and shared runner registration tokens.
Only applicable on initial setup, changing these settings after database is created and seeded won’t yield any change.
https://gitlab.com/gitlab-org/omnibus-gitlab/blob/master/files/gitlab-config-template/gitlab.rb.template
Start up the GitLab container with: docker-compose up -d gitlab
This will download the GitLab Docker image and run our GitLab container. The initial startup of GitLab takes some time as it has to create all files, save configurations, cook some bacon, so on and so forth. You can check on the status of GitLab with docker logs -f gitlab
Once the logs start spamming log entries that look like this, it should be available under your adress gitlab.YOUR-DOMAIN.TLD. Hit F5 regularly to start configuring the root account as soon as possible.
==> /var/log/gitlab/gitlab-workhorse/current <==
{"content_type":"","correlation_id":"*********************","duration_ms":0,"host":"*********","level":"info","method":"POST","msg":"access","proto":"HTTP/1.1","referrer":"","remote_addr":"*************","remote_ip":"*************","route":"^/api/v4/jobs/request\\z","status":204,"system":"http","time":"2021-07-02T19:39:49Z","ttfb_ms":0,"uri":"/api/v4/jobs/request","user_agent":"gitlab-runner 13.12.0 (13-12-stable; go1.13.8; linux/amd64)","written_bytes":0}

==> /var/log/gitlab/nginx/gitlab_access.log <==
172.19.0.31 - - [02/Jul/2021:19:39:49 +0000] "POST /api/v4/jobs/request HTTP/1.1" 204 0 "" "gitlab-runner 13.12.0 (13-12-stable; go1.13.8; linux/amd64)" -
If you’ve opted to set the initial root password via the container configuration, you can safely remove said config line from the docker-compose, run docker-compose up -d, wait for GitLab to be back up again and continue from there.
After you’ve setup your root user, you should be able to head to the administration area of your GitLab area at gitlab.YOUR-DOMAIN.TLD/admin. Notice how there are green checkmarks at Container Registry and GitLab Pages!
Example from my own GitLab instance:
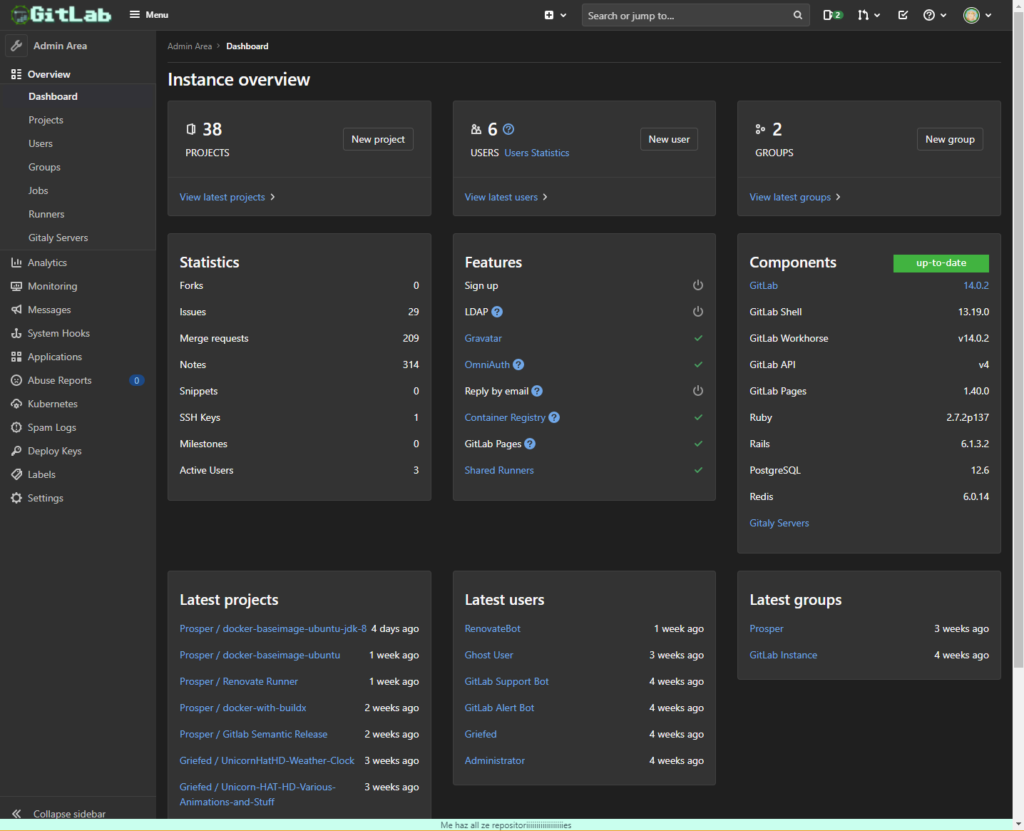
It’s also a good idea to browse to Settings -> General -> Sign-up restrictions and disabling Sign-up so no other people can register to your GitLab instance until you re-enable it.
Users and groups
Now that our GitLab is up and running and no strangers can sign-up, it is time to create our own user and group.
Users
Your own user
From the admin area, head over to Overview -> Users and click on “New user” on the top right. We will need to create two users. The first one is your own account which you will be using after it#s creation, the other will be used later when we setup dependency update automation.
Create you own user with your preferred name, username, email etc. Allow said user to create groups and set the Access level to Admin. You might as well check Validate user account, too.
Login to your newly created user. We will be doing the rest by using your own user now, who also has admin right, so they can do all we want to do.
After logging into your user, click on your profile picture in the top right, Preferences -> on the left Access Tokens and create a new personal access token for your GitLab user. Give it full access. We will be using this token in pretty much all repositories from now on.
RenovateBot user
Now we need a user for the RenovateBot dependency checker bot which we will be making use of later. Set the name and username to RenovateBot, the email to renovatebot@YOUR-MAIL-PROVIDER.TLD, regular user access level and check Validate user account.
Our RenovateBot user does not need admin rights. Still logged in as your own user, in the Admin area head over to Overview -> Users -> RenovateBot and click on Impersonate on the top right. Now, as RenovateBot, generate a personal access token with
- read_user scope
- api scope
- write_repository scope
and save it somewhere for use later on. More on that later. Exit impersonation mode by clicking the Incognito icon in the top right.
Groups
From the admin area head on over to Overview -> Groups and click on New group
Set the name of the group to something you like and will stick with. You can, of course always delete the group and create a new one, but then you’d have to setup later things all over again. Best to think of a name you will keep.
Set the groups visibility level to either Private, Internal, or Public. The rest can pretty much stay on default settings, unless you want to restrict access any further. That’s up to you.
Reconfiguring GitLab/NGINX
Now that we have our user and groups, we need to go back to our GitLab and NGINX configs.
On your server, edit your docker-compose.yml file with your editor of choice again and edit the configuration for SWAG. Edit SUBDOMAIN and add YOUR_GITLAB_USERNAME.pages,YOUR_GITLAB_GROUPNAME.pages to it, to reflect your own username as well as the name of group you just created
The configuration for SWAG should now look similar to this, but of course, with the relevant values replaced by your own:
  swag:
    image: ghcr.io/linuxserver/swag:2.6.0
    container_name: swag
    restart: unless-stopped
    cap_add:
      - NET_ADMIN
    ports:
      - 443:443
      - 80:80
    volumes:
      - ./swag/config:/config
    environment:
      - PUID=1000
      - PGID=1000
      - TZ=Europe/Berlin
      - URL=YOUR-DOMAIN.TLD
      - SUBDOMAINS=gitlab,registry,pages,YOUR_GITLAB_USERNAME.pages,YOUR_GITLAB_GROUPNAME.pages
      - VALIDATION=http
      - EMAIL=encrypt@YOUR-DOMAIN.TLD
      - STAGING=false
      - DOCKER_MODS=linuxserver/mods:swag-ffmpeg|linuxserver/mods:swag-imagemagick|linuxserver/mods:swag-auto-reload|linuxserver/mods:swag-ioncube
Save your docker-compose.yml and run docker-compose up -d in the directory where said file resides in. SWAG will restart and request certificates for the two newly added subdomains from Lets Encrypt. When SWAG has done its thing, everything will be accessible again.
We’ve now successfully prepared your NGINX and GitLab to serve websites under your GitLab user and group!
GitLab Runner
Installation
Add GitLab Runners repository to APT
Run sudo curl -L "https://packages.gitlab.com/install/repositories/runner/gitlab-runner/script.deb.sh" | sudo bash
This will add GitLab Runners repository to the APT sources list in /etc/apt/sources.list.d/. You can check it with nano /etc/apt/sources.list.d/runner_gitlab-runner.list. It should read
# this file was generated by packages.gitlab.com for
https://docs.gitlab.com/runner/install/linux-repository.html
# the repository at https://packages.gitlab.com/runner/gitlab-runner
deb https://packages.gitlab.com/runner/gitlab-runner/ubuntu/ focal main
deb-src https://packages.gitlab.com/runner/gitlab-runner/ubuntu focal main
Now install GitLab Runner with: sudo apt-get install gitlab-runner
Registration
Now we will need a bit of information from our GitLab installation.
- URL: gitlab.YOUR-DOMAIN.TLD. Head to the admin area in GitLab, Overview -> Runners and copy the URL that is listed on the right side under
Register the runner with this URL: - TOKEN: Head to the admin area in GitLab, Overview -> Runners and copy the token that is listed on the right side under
And this registration token: - Description:
GitLab shared runner one.This can be whatever you want it to be. This helps you identify the runner should you ever add more than one. - Tags:
Shared, My-First-Runner. This can be whatever you want it to be. This helps you identify the runner should you ever add more than one. - Executor:
docker - Default docker image:
ubuntu:20.04
Now execute sudo gitlab-runner register. You will be asked, one by one, to enter the information I listed above. Afterwards, when the registration is complete, you can head over to your GitLab admin under Overview -> Runners and see that our newly added gitlab runner is now listed. Example:

Configuration
Our GitLab Runner will encounter a couple of problems if we were to start CI/CD jobs now. On your server, open the GitLab Runner configuration with sudo nano /etc/gitlab-runner/config.toml and add any and all missing lines from the config below. Do not change the url, token, executor, but simply add any lines which you can not find in your own config.
concurrent = 1
check_interval = 0

[session_server]
  session_timeout = 1800

[[runners]]
  name = "Runner-One"
  url = "https://gitlab.YOUR-DOMAIN.TLD"
  token = "******"
  executor = "docker"
  environment = ["DOCKER_TLS_CERTDIR="]
  [runners.custom_build_dir]
  [runners.cache]
    [runners.cache.s3]
    [runners.cache.gcs]
    [runners.cache.azure]
  [runners.docker]
    tls_verify = false
    image = "ubuntu:20.04"
    privileged = true
    disable_entrypoint_overwrite = false
    userns_mode = "host"
    cap_add = ["NET_ADMIN"]
    oom_kill_disable = false
    disable_cache = false
    volumes = ["/var/run/docker.sock:/var/run/docker.sock", "/cache", "/tmp:/tmp:rw"]
    cache_dir = "/cache"
    shm_size = 0
  [runners.custom]
    run_exec = ""
When you’re done, save the config file and exit the editor. Restart the GitLab Runner to ensure the edited config is used: sudo gitlab-runner restart
Test drive
Now things will get interesting.
Head on over to https://git.griefed.de/prosper/docker-baseimage-ubuntu, click on “Clone” and copy the URL shown under “Clone with HTTPS“
In your own GitLab instance, head on over to Menu -> Groups -> Your Groups and click on the group we created earlier.
Now click on New Project -> Import Project -> Repo by URL and copy our previously copied URL into the Git repository URL field.
The rest can be configured however you want it to. Depends on what you intend to do with it.
If you now click on Create project GitLab will clone the repository from earlier into a new repository on in your own GitLab instance in the namespace of your group.
In your newly created project, head on over to Settings -> CI/CD and expand the Variables section. Add the following variables:
- DOCKERHUB_REPO = baseimage-ubuntu (Create a repository on DockerHub)
- DOCKERHUB_TOKEN = <your-dockerhub-token>
- DOCKERHUB_USER = <your-dockerhub-username>
- GITHUB_TOKEN = <your-github-token>
- GITLAB_TOKEN = <your-gitlab-token>
Now, click on CI/CD -> Run pipeline and start a CI/CD run by clicking Run pipeline again. Our GitLab Runner should now recieve jobs from our GitLab instance and start building our first Docker image. Said Docker image will be a multiarch image, built by manipulating manifests. At the end of the pipeline run your GitLab Container Registry, DockerHub account and GitHub account will have a amd64,arm/v7 and arm/v8 Ubuntu baseimage with s6-overlay preinstalled available to them.
Congratulations! You’ve installed and configured GitLab and GitLab Runner to host your repositories and run you CI/CD jobs for you!
Check the .gitlab-ci.yml-file in the cloned repository to see how this manifest-manipulation-multiarch-image is created.
RenovateBot
Installation
Head on over to https://gitlab.com/renovate-bot/renovate-runner and copy the Clone with HTTPS URL. Setup a new repository in your group, much like you did with the Ubuntu baseimage previously, but this time by using the previously copied clone-URL.
After the cloning is complete and GitLab has created the Renovate Runner repository in your group, head on over to said repository to Settings -> CI/CD and expand the variables section. Add
- GITHUB_COM_TOKEN = <your-github-token>
- RENOVATE_TOKEN = <your-renovate-token>
Configuration
.gitlab-ci.yml
Edit .gitlab-ci.yml in the Renovate Runner repository and change the name of the file to Renovate.gitlab-ci.yml. Add a new file to the repository and name it .gitlab-ci.yml and paste the following into it:
image: renovate/renovate:32.105.0-slim@sha256:24b899ee3f8d21f26e66e0441d0367e973d7541e0327ce5112ea6cd16a5a77a3

services:
  - name: docker:20.10.17-dind@sha256:6dd895238f055a79a6d044f7d97b668bef0f9a840e5eed06fa01f1a6b7aed17e
    alias: docker

variables:
  DOCKER_DRIVER: overlay2
  DOCKER_HOST: tcp://docker:2376
  DOCKER_TLS_VERIFY: 1
  DOCKER_TLS_CERTDIR: /certs
  DOCKER_CERT_PATH: /certs/client

  RENOVATE_BASE_DIR: $CI_PROJECT_DIR/renovate
  RENOVATE_ENDPOINT: $CI_API_V4_URL
  RENOVATE_PLATFORM: gitlab
  RENOVATE_GIT_AUTHOR: Renovate Bot <bot@renovateapp.com>
  RENOVATE_ONBOARDING_CONFIG: '{"$$schema": "https://docs.renovatebot.com/renovate-schema.json", "extends": ["config:base"] }'
  RENOVATE_OPTIMIZE_FOR_DISABLED: 'true'
  RENOVATE_REPOSITORY_CACHE: 'true'
  RENOVATE_REQUIRE_CONFIG: 'true'
  RENOVATE_ONBOARDING: 'true'
  RENOVATE_IGNORE_PR_AUTHOR: 'true'
  RENOVATE_EXTENDS: 'github>whitesource/merge-confidence:beta'
  RENOVATE_LOG_FILE: renovate-log.ndjson
  RENOVATE_LOG_FILE_LEVEL: debug
  LOG_LEVEL: debug

default:
  cache:
    key: ${CI_COMMIT_REF_SLUG}-renovate
    paths:
      - renovate/cache/renovate/repository/**/*.json

stages:
  - test
  - deploy

renovate:
  stage: deploy
  resource_group: production
  rules:
    - if: '$CI_PIPELINE_SOURCE == "schedule"'
  script:
    - renovate $RENOVATE_EXTRA_FLAGS
  artifacts:
    when: always
    expire_in: 1d
    paths:
      - "$RENOVATE_LOG_FILE"

renovate:dry-run:
  script:
    - renovate --dry-run=true $RENOVATE_EXTRA_FLAGS
  rules:
    - if: '$CI_COMMIT_BRANCH'
    - if: '$CI_PIPELINE_SOURCE == "merge_request_event"'

renovate:on-schedule:
  only:
    - schedules
  script:
    - renovate $RENOVATE_EXTRA_FLAGS
Finish and safe by clicking on Commit changes.
renovate.json
Edit renovate.json and change the name of the file to OLD_renovate.json.backup. Add a new file to the repository and name it renovate.jsonand paste the following into it:
{
  "extends": [
    "config:base",
    ":semanticCommitTypeAll(build)",
    ":enableGradleLite"
  ],
  "gradle-lite": {
    "enabled": true
  },
  "prHourlyLimit": 0,
  "branchConcurrentLimit": 0,
  "prConcurrentLimit": 0,
  "branchPrefix": "renovate-",
  "labels": ["dependencies"],
  "assignees": ["YOUR_USERNAME"]
}
Rename YOUR_USERNAME to your username as you will, or already have, created it on your GitLab instance.
Finish and safe by clicking on Commit changes.
package.json
Edit package.json and change the content to:
{
  "devDependencies": {
    "semantic-release": "19.0.3",
    "@semantic-release/gitlab": "9.3.2"
  }
}
Finish and safe by clicking on Commit changes.
Scheduling
Now with RenovateBot configured, we need to tell GitLab to run its pipeline on a regular basis, so it can check for dependency upgrades.
Whilst in your RenovateBot repository,
1. head on over to CI/CD -> Schedules in the menu on the left.
2. hit New schedule
3. give your schedule a name
4. specify when this schedule should run. An example would be a custom CRON expression 0 12 4 1-12 * which will run at 12:00 on day-of-month 4 in every month from January through December. See https://crontab.guru/#0_12_4_1-12_*
5. set your timezone
6. set the target branch
7. Configure any variables this schedule may need
1. This is optional. You can safely skip 7.
8. Unless already checked, set this schedule to active by checking the checkbox below Activated
9. hit Save pipeline schedule
Done! GitLab will trigger a RenovateBot run at 12:00 on day-of-month 4 in every month from January through December which, in turn, will check any configured repositories for dependency updates.
Enabling RenovateBot on a repository
In order for RenovateBot to check and update dependencies in a repository, it needs access to a repository.
Go to docker-baseimage-ubuntu which we cloned in a previous step. In said repository, go to Project information -> Members and invite RenovateBot to the project.
Click on the filed below GitLab member or Email address and select RenovateBot.
Select the Developer role.
Click on Invite.
Now RenovateBot has access to our repository. In order for RenovateBot to actually do anything on said repository, we need a configuration file for it, so it knows what to do. The cloned repository already has this config-file. We just need to edit it a bit.
Edit renovate.json in the docker-baseimage-ubuntu repository so it looks like this:
{
  "$schema": "https://docs.renovatebot.com/renovate-schema.json",
  "extends": [
    "config:base"
  ],
  "prConcurrentLimit": 5,
  "labels": ["dependencies"],
  "assignees": ["YOUR_USERNAME"]
}
Rename YOUR_USERNAME to your username as you will, or already have, created it on your GitLab instance.
Every repository which RenovateBot has access to and for which you want dependency checks needs this file. If a configuration for RenovateBot is not present, but it has access to a repository, RenovateBot will create a merge request to add said file to the repository.
Dedicated RenovateBot GitLab Runner
Register a new GitLab Runner
Now we just need to register a dedicated GitLab Runner which will run the RenovateBot schedule.
1. Repeat the GitLab Runner registration from the GitLab Runner Registration chapter.
2. Edit your GitLab Runner configuration with sudo nano /etc/gitlab-runner/config.toml
3. Make sure your RenovateBot GitLab Runner configuration looks like the following:
[[runners]]
  name = "RenovateBot"
  url = "https://gitlab.YOUR-DOMAIN.TLD"
  token = "******"
  executor = "docker"
  limit = 1
  [runners.custom_build_dir]
  [runners.cache]
    [runners.cache.s3]
    [runners.cache.gcs]
  [runners.docker]
    tls_verify = false
    image = "docker:stable"
    privileged = true
    disable_entrypoint_overwrite = false
    oom_kill_disable = false
    disable_cache = false
    volumes = ["/certs/client","/cache", "/tmp:/tmp:rw"]
    shm_size = 0
  [runners.custom]
    run_exec = ""
Limit the RenovateBot GitLab Runner to our RenovateBot repository
In the Admin Area
1. head on over to Overview -> Runners
2. edit the newly added RenovateBot runner by clicking the pencil-symbol on the right
3. find the RenovateBot repository from the list of repositories and hit Enable on this repository.
4. hit Save changes
5. Make sure the checkbox Lock to current projects and Run untagged jobs are checked.
1. You may need to uncheck Protected, depending on your desired outcome of the RenovateBot configuration. You can leave it unchecked for now, because the RenovateBot repository is supposed to only be visible to you anyway.
6. On your server, execute sudo gitlab-runner restart for all our changes to take effect.
Done!
RenovateBot now has a dedicated GitLab runner which will run the schedule we configured above.
Why did we do this? Easy. If we had not given RenovateBot a dedicated runner, any pipelines triggered or running for any other repository would be executed by one runner only. In order to split the load and allow our dependency checks to run independant of any other actions, we dedicate a runner to RenovateBot, so CI/CD can be…well…CI/CD, with as little interference as possible.
CI/CD
We’ve now went through everything needed for a full CI/CD environment. We’ve got
- a GitLab Runner running our pipelines
- a RenovateBot checking dependencies
- a .gitlab-ci.yml building a Docker multiarch image with manifest manipulation
CI/CD Variables
You’ve probably already guessed it, but the variables we created in Settings -> CI/CD -> Variables earlier tell our pipelines and jobs what to do at certain stages.
DOCKERHUB_REPO and DOCKERHUB_USER are self-explanatory. They tell our pipeline the name of the Docker repository and the Docker username under which to publish and tag our images.
DOCKERHUB_TOKEN is needed for access to the DockerHub account. Without it, we would not be able to login to our DockerHub account, so we would not be able to push images to the DockerHub repository.
GITHUB_TOKEN is necessary in order to login to the GitHub Container Registry. Because we like to keep things simple, DOCKERHUB_REPO and DOCKERHUB_USER can be used here as well. Without it, we would not be able to login to our GitHub Container Registry, so we would not be able to push images to GHCR.
GITLAB_TOKEN is needed for the release job in our pipeline. Without it, Semantic-Release would not be able to create and publish releases.
.gitlab-ci.yml
We’ve defined a couple of different jobs in our .gitlab-ci.yml file, divided into three stages test, release and build.
test: This stage runs your, you guessed it, tests! Only when all tests succeed, will later stages and jobs therein be triggered. This helps us prevent releases with broken assets. In case of the docker-baseimage-ubuntu repository, our test stage builds our Docker image.
release: If our tests succeed, this stage is triggered and the release job started. All commits since the last tag creation are checked for conventional commits and if any commit, as configured in .releaserc.yml, is found, a new tag and release are created.
build: Only if a new tag is created, so when the release stage finishes and creates a release, is this stage triggered and our build job started. In the case of docker-baseimage-ubuntu, it will take the version number from our newly created tag and build our multiarch Docker image, tag it with latest and the version of our newly created git tag and publish it to DockerHub, GHCR and to our GitLab Container Registry.
.releaserc.yml
You must edit this file and replace gitlabUrl: 'https://git.griefed.de/' with your own GitLab URL, otherwise, releases will fail!
This file tells Semantic-Release how to behave and how to process commits. The most important part of this configuration file is the analyzeCommits section. This tells Semantic-Release which commit prefixes should trigger what kind of release. Edit it to your liking.
Also good to take a look at is the generateNotes section. This defines the way the changelog, which will be generated for the new release, will look like. type refers to the conventional commit type, section is the headline this commit type will be assigned in the changelog and hidden lets you hide this section from the changelog. Change it to your liking.
Mirroring repositories to GitHub
In order to mirror a repository from GitLab to GitHub, we first need to create said repository on GitHub. We will not create a blank repository on GitHub and mirror into that, instead we will import our GitLab repository to GitHub and then setup mirroring. It has to be done this way so the refs and commits are the same in both repositories. If there are any differences, the mirroring from GitLab will fail and you will have a hard time fixing things.
On GitHub, head over to your repositories and click on New, followed by a click on Import a repository.
Retrieve the docker-baseimage-ubuntu repository URL from your GitLab instance the way we did before, by clicking on Clone and copying the HTTPS clone URL. Paste said URL into the Your old repository’s clone URL field. Set the Repository Name to docker-baseimage-ubuntu, decide whether you want it to be public or private, and click on Begin import.
Now, copy the clone URL from your newly imported GitHub repository. In your GitLab docker-baseimage-ubuntu repository, head on over to Settings -> Repository -> Mirroring repositories and paste your GitHub clone URL into the Git repository URL field. Edit the URL and add YOUR-GITHUB-USERNAME@ before the github.com part so it looks similar to https://YOUR-GITHUB-USERNAME@github.com/…
For the Password field, enter your GitHub token. Make sure Keep divergent refs is checked and if you prefer, check Mirror only protected branches. When you’ve set everything to your liking, click on Mirror repository.
GitLab will now mirror every commit, tag etc. to your GitHub repository. Note: Releases are not mirrored, because GitLab and GitHub handle these differently. Tags, however, are mirrored. We will get to that in the next part.
Mirroring releases on GitHub
In your GitLab repository, take a look at the file in .github/workflows/github_release.yml. This file is responsible for creating a release on GitHub whenever a new tag is pushed to the repository. This happens when our GitLab CI/CD release stage creates a new release, because first a git tag needs to be created, before a release can be created for said tag.
As I’ve mentioned before, only tags are mirrored from GitLab to GitHub. The releases themselves are not part of the repository, only the tags are. So, in order to generate a release on GitHub as well, we need a workflow that checks whether a new tag was pushed, and if one was pushed, create a release for said tag.
That’s what this GitHub workflow does:on: push: tags: - '*' Only when a new tag is pushed to the repository, will this workflow be triggered.
This workflow will take the newly pushed tag, extract the version number, and generate a GitHub release for said version and attach it to the corresponding tag.
So, technically speaking, we are not mirroring a release from GitLab to GitHub, but rather making sure that when a tag, and thereby a release, is created on GitLab, it is also created on GitHub after the corresponding tag is mirrored from GitLab to GitHub.
Further CI/CD examples
And now, for the end of this blog post, I will provide you with further examples for CI/CD solutions.
We’ve got a fully working example with Docker and multiarch images by making use of Docker manifests, but what about building multiarch images with buildx. What about CI/CD for Gradle and therefor Java? What about NodeJS?
The following three repositories provide you with working examples of how buildx, Gradle and NodeJS can be used in CI/CD on GitLab.
Furthermore, the NodeJS example also provides an example on how to work with GitLab Pages.
buildx
Clone docker-baseimage-ubuntu-jdk-8 into your GitLab instance.
Make sure you
- setup your CI/CD variables
- edit
.releaserc.ymlaccordingly - edit
renovate.jsonaccordingly
Take a look at the .gitlab-ci.yml of this repository. Remember our docker-baseimage-ubuntu repository, and how that repositories multiarch image was build by using manifest manipulation? This repository makes use of the image created by docker-baseimage-ubuntu, and because said image is already multiarch-ready, we can now build our own images from docker-baseimage-ubuntu by using buildx. Much simpler, way less confusing code.
buildx uses QEMU platform emulation to build Docker images for different platforms. Our --platform linux/amd64,linux/arm/v7,linux/arm64 argument tells buildx which platforms to build our image on. --push tells buildx to push our images to our registries once the build process has finished successfully. The rest is pretty much the same as your regular Docker build command. You can make use of --build-arg and --tag any way you want.
Gradle
Clone ServerPackCreator into your GitLab instance.
Make sure you
- setup your CI/CD variables
- edit
.releaserc.ymlaccordingly - edit
renovate.jsonaccordingly
Take a look at the Build TestGenerate Release and Build Release jobs in the .gitlab-ci.yml-file.
The Build Test
The Generate Release job generates a release on GitLab according to conventional commits, complete with a changelog.
The Build Release job builds the release after the generation of the tag and release was done in a previous job. This job also links assets to the generated release for easy download of any asset we want to expose to the public.
NodeJS/Quasar
Clone Griefed.de into your GitLab instance.
Make sure you
- setup your CI/CD variables
- edit
.releaserc.ymlaccordingly - edit
renovate.jsonaccordingly
Take a look at the pages job in the .gitlab-ci.yml-file. This job builds our Quasar project by using the official NodeJS image node:16.3.0-alpine3.13, installing the Quasar framework, running the quasar build-process and then copying the resulting build to a folder called public.
GitLab Pages
Adding on to the NodeJS/Quasar chapter, the pages-job also publishes build artifacts to GitLab pages.
Afterwards, these pages will be available at either
- https://YOUR-USERNAME.pages.gitlab.YOUR-DOMAIN.TLD or
- https://YOUR-GROUPNAME.pages.gitlab.YOUR-DOMAIN.TLD
Congrats!
Congratulations! You made it. You’ve got a running GitLab instance with CI/CD, Pages, Container Registry and example repositories for different coding languages and ways to use them in your pipelines.
Should you encounter any problems or straight up errors with the information presented in this post, feel free to send me either a mail at griefed@griefed.de or join my Discord server.
Until then, happy coding and happy…gitting? Is that a word? Dunno.
Anyway, have fun!
Cheers,
Griefed