Preface
So, you’ve recently got your hands on a root-server with some serious power under its hood? You’ve heard of people running their own Windows Servers for AD-provisioning and other things, all behind a VPN to keep things secure?
You’ve heard terms like “kvm” or “qemu” before, but nether really bothered to look them up or to get into the topic of seeting up VMs on a headless system?
Well then, you’ve come to the right place!
In this post I will guide you through the necessary steps to setup a Windows Server 2022 VM using kvm/qemu, behind a Wireguard VPN, which you will then be able to access via Remote Desktop (RDP).
None of this would’ve been possible without the help of Hellcat and his GitHub repo providing templates and other nice things all around QEMU/KVM.
Be sure to check out the repository, as it also contains scripts which help you set up port forwarding from your host to your VM, in case you want to expose a service running in a VM to the outside-world.
Requirements:
- Windows Server 2022 Eval Installation ISO (available here)
- virtio Windows Drivers ISO (available here) (this version was used in this guide)
- QEMU, KVM, Docker and Docker Compose packages
- Key-Based authentication to your root-server
- root- or sudo privileges on your root-server
- At least 150Gb free space on your root-server
- VNC Viewer (available here)
This guide was written using:
- Windows 10 for the local home-device
- Ubuntu 22.04LTS for the root-servers OS
- Windows Terminal for SSH-connections and VNC port-forwarding
Table of Contents
1. VNC Preparations
First things first:
In order to connect to the Windows Server VM later on, we need to prepare a little something on our local device at home. Because our VM will not be accessible from the outside directly, we need to forward the VNC port through an SSH-session.
Open a Windows Terminal and run the following command, replacing
– <Drive> with the drive-letter which hosts your private-key
– \Path\To\Your\Private\Key with the actual path to your private-key on said drive
– <YourRootServerUser> with your user with which you connect to your server
– <Your.Root.Server.IP> the IP of the root-server you connect to
ssh -i <Drive>:\Path\To\Your\Private\Key -L 5900:127.0.0.1:5900 <YourRootServerUser>@<Your.Root.Server.IP>This one may be a little confusing. What this does is, it forwards the port 5900 on our local device to the port 5900 on our server, but acting as if it was accessed from the root-servers side, through the SHH connection we establish via the use of our private key.
Confusing, eh? Yeah…
2. Packages and Groups
2.1 Packages
Since we are already on our server via the SSH connection from chapter 1, we might as well install the required packages now, so we can later use QEMU and KVM. The following command should install all required packages in one go:
sudo apt-get install -y --install-suggests qemu qemu-block-extra qemu-guest-agent qemu-system qemu-system-common qemu-system-data qemu-system-gui qemu-system-x86 qemu-user qemu-utils libvirt-clients libvirt-daemon libvirt-daemon-config-network libvirt-daemon-config-nwfilter libvirt-daemon-driver-qemu libvirt-daemon-system libvirt-daemon-system-systemd libvirt0 dnsmasq dnsmasq-base dnsmasq-utils2.2 Groups (optional)
To use kvm, libvirt and all those good commands as your regular, non-root, user, if you so desire, run
sudo usermod -aG kvm,libvirt <YourUser>3. Required Files and Templates
3.1. ISOs
On your server, create a directory in which you want to store our VM-related files, such as ISOs, Disk-Images for harddrives, templates and so on and so forth.
In my case I simply created a directory in the root of the filesystem, called: vms
In that directory I then created a couple of sub-directories, which host different things based on the overall topic of said directory, namely:
– isos
– machines
– templates
– scripts
Assuming you’ve used the same directory-setup as above, switch into the isos-directory and download the virtio ISO, using your favourite download-mechanism. In this example, we will use wget:
wget https://fedorapeople.org/groups/virt/virtio-win/direct-downloads/archive-virtio/virtio-win-0.1.229-1/virtio-win-0.1.229.isoYou’ll have to download the Windows Server ISO through your local browser, and then upload it using WinSCP, I’m afraid. There may be direct links to said ISO available on some sites out there, but we can’t really make sure those ISOs haven’t been tempered with in some form, so your best bet is to acquire your files from the official source.
After you’ve downloaded the Windows ISO to your local device, and uploaded it to the /vms/isos-directory on your server, proceed to the next bit.
3.2. Templates
The almighty wizard of paws, chaotic furrbal of mayhem, lord of bad jokes and overall mad genius Hellcat has kindly provided both a network and a VM template, available here.
On your server, switch to your /vms/templates-directory and create two new files, vm-definition.xml and vm-network-definition.xml.
Paste the contents of the vm-definition.xml from the repository linked above into your vm-definition.xml-file on your server, then do the same for vm-network-definition.xml.
Before you can use either of these templates, you need to change a couple of things around to fit your server and your needs.
3.2.1 VM Template
Because we will be creating a Windows Server VM in this guide, we can create a copy of the vm-definition.xml and prepare it for a Windows Server VM already. To do so:
- Create a new directory in /vms/machines matching the name of the Windows VM you want to create. Now’s the time to pick the name. In this example, said directory will be named win2k22-01
- Copy the vm-definition.xml from /vms/templates to the newly created /vms/machines/win2k22-01-directory
- Open said copy in your favourite text-editor and
- Replace the value inside <name> with win2k22-01
- Replace the value inside <uuid> with a new one generated by the use of the uuid-command
- Replace the value inside <title> with a more readable one, in this case it will be Win2k22-01
- If you want, you can give your VM a description, to help you identify its use-case at a later date. To do so, change the value inside <description>
- If your root-server has enough RAM available, you may leave the value inside <memory> and <currentMemory> as they are. You may change these to your hearts content, just make sure to set both entries to the same value.
- Set the value for <vcpu> to 4
- Set the <topology> block to
<topology sockets='1' dies='1' cores='2' threads='2'/> - Set the value of the <nvram> block with /vms/machines/win2k22/OVMS_VARS.fd
- In the <devices>-section
- Edit the file-value in <source file=’/data/vms/my-super-vm/hdd1.raw’/> to /vms/machines/win2k22/win2k22-hdd-01.raw – This will be the disk in which the Windows Server OS will be installed into later on
- Change the value of the <serial>-block if you so desire
- Edit the file-value in <source file=’/vms/SERVER_EVAL_x64FRE_en-us.iso’/> to /vms/isos/SERVER_EVAL_x64FRE_en-us.iso. This is the Windows Server 2022 ISO we will be using to install the OS.
- Edit the file-value in <source file=’/data/virtio-win.iso’/> to /vms/isos/virtio-win-0.1.229.iso. This is the drivers-disk we will be using during the OS installation and setup.
- Remove the <interface>-block of the type ‘bridge‘. We can not use that one on a remote root-server, or rather, we do not want to.
3.2.2 Network Template
Open your vm-network-definition.xml in your favourite text-editor and
- Change the <name>-value if you so desire
- Change the <uuid>-value if you so desire. Use the
uuid-command to generate a new uuid. - Replace 10.11.12.13 in
<address start='10.11.12.13' end='10.11.12.13'/>with your root-servers IP. - Remove the second <host>-block in the <dhcp>-section.
- Edit the remaining <host>-block’s mac and name according to the win2k22-template defined in chapter 3.2.1. Using the defaults, the
- mac would be 48:43:00:ca:09:01
- name would be win2k22-01
- IP would stay the same, at 192.168.241.201
3.3. VM Disk
Now, to get a little bit closer to finally creating our VM, create the image in which all the VMs data will be written and stored in. To create said image, change back to the VMs directory, if you’ve left it (remember, it was /vms/machines/win2k22)
qemu-img create -f raw img-in.raw 128G
# Optionally, if you want to prepare a fully zeroed-disk, also run the following command to "blow" up the disk to the desired size of 128G
# This will reduce fragmentation on the OS' side, but also make sure you don't lose sight of your root-servers used up space ;)
pv img-in.raw | dd of=win2k22-hdd-01.raw bs=1M
rm img-in.raw
4. Networking
To create the VM network through which our Windows Server VM will be accessible, and through which the Windows Server VM will be able to access ze interwebz, run the following command, using the template we defined in chapter 3.2.2:
virsh net-define --file /vms/templates/vm-network-definition.xml
# Depending on whether virsh is having a good day, you may need to run the following commands for autostart of the network, too:
virsh net-autostart vmnet1

# Check that the network was created. vmnet1 should be in the list of networks
virsh net-list
5. The Virtual Machine
Now! To FINALLY create our first virtual machine using QEUM/KVM, after all that preparation, change to the /vms/machines/win2k22-directory and run the following command:
virsh define win2k22.xml

# To confirm that the VM was successfully created, run
virsh list --all
That’s all there is to it. You just created your first VM using QEMU/KVM. Don’t start it yet, though, we’re not quite there yet.
6. First Contact
Remember how we set up our VNC portforwarding in chapter 1? Well, I hope you haven’t closed that window by now. If you have, repeat the steps in chapter 1 and return here.
Open VNC Viewer (see the Requirements-section in the Preface-chapter), choose File -> New Connection and enter 127.0.0.1:5900 in the VNC Server-field. This is where the portforwarding does its magic-bit. Don’t connect yet, though!
On your server, run the following command
virsh start Win2k22-01Now connect to the VNC session and enter the Boot Manager of the VM. You should be greeted with a screen similar to this one:
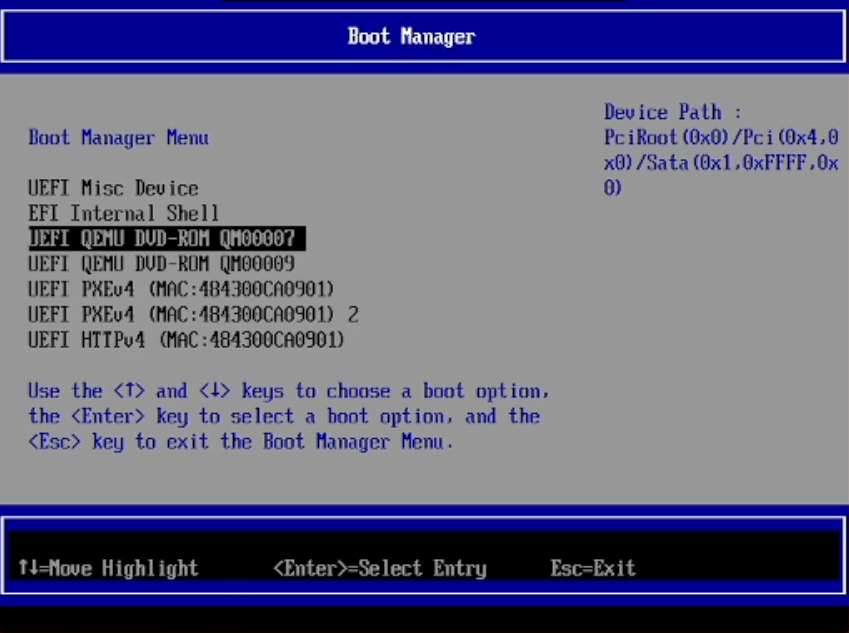
6.1 Installing Windows Server 2022
As per chapter 6. you should now select the first DVD-drive available in the list of available drives. The first drive should host the Windows Server 2022 Eval ISO, as it was also the first drive defined in our XML earlier on.
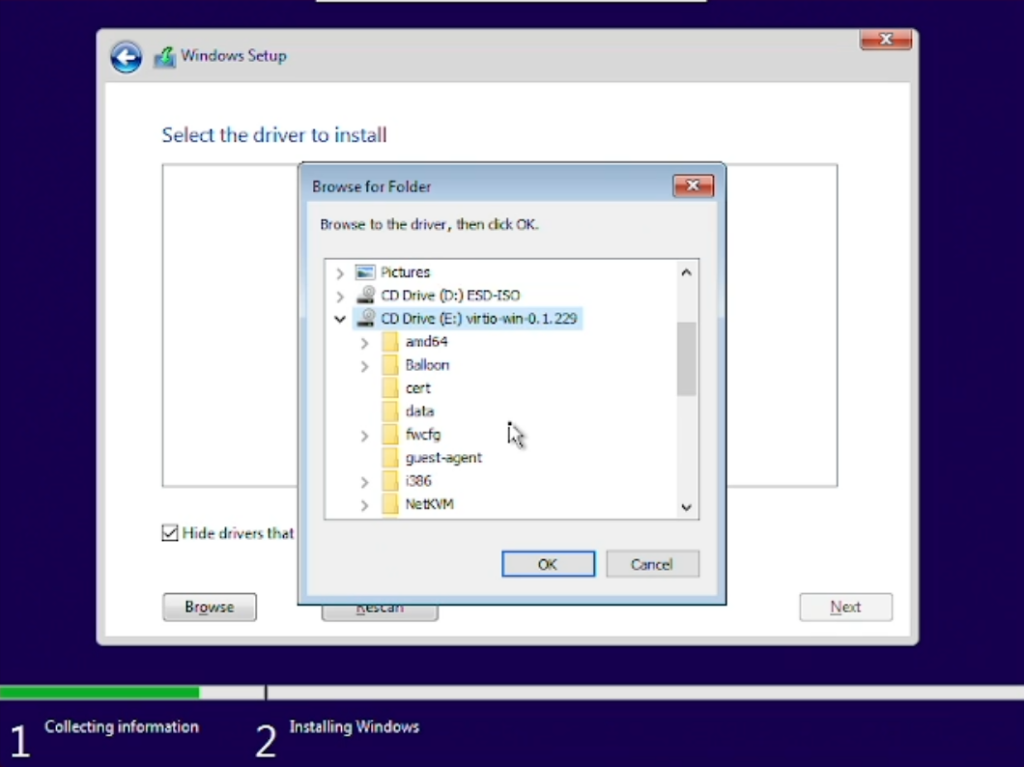
The installation of Windows Server is the usual bit Microsoft throws at you when installting a new Windows / Windows Server, with just one difference: Drivers
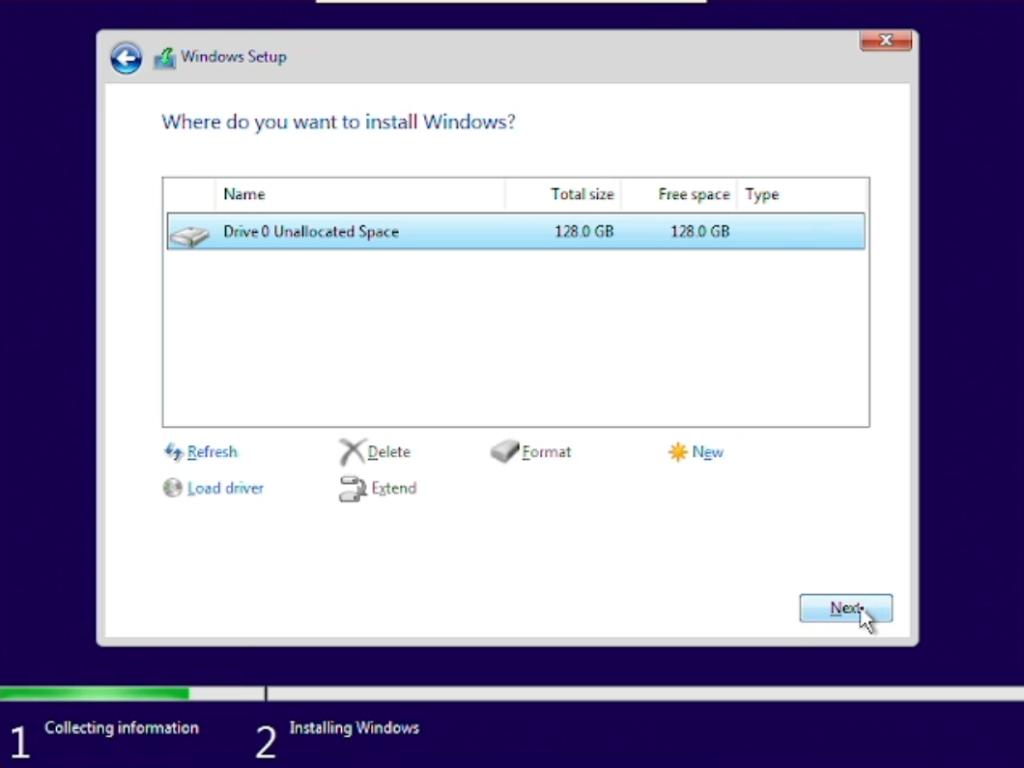
When entering the section of the setup where you need to create the volume to install Windows on, you will notice that no drives are available:
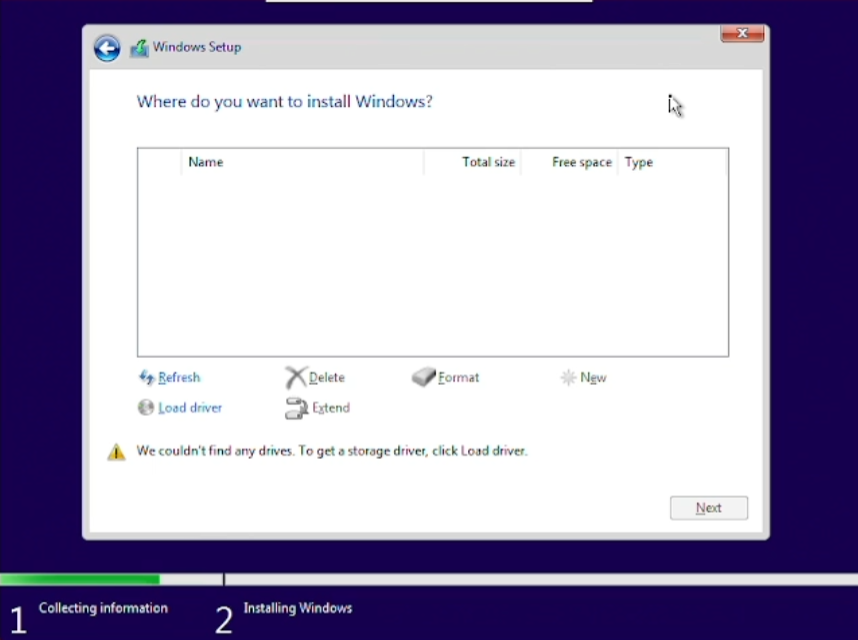
Not to worry, though, that is excatly why we also mounted/defined the virtio-ISO, as that has all the drivers we need in order to fully go through with our installation.
Hit Load driver, browser to the virtio-drive, in said drive, browser to amd64/2k22 and hit ok. Confirm the next dialog with Next and let the installation load all necessary drivers.
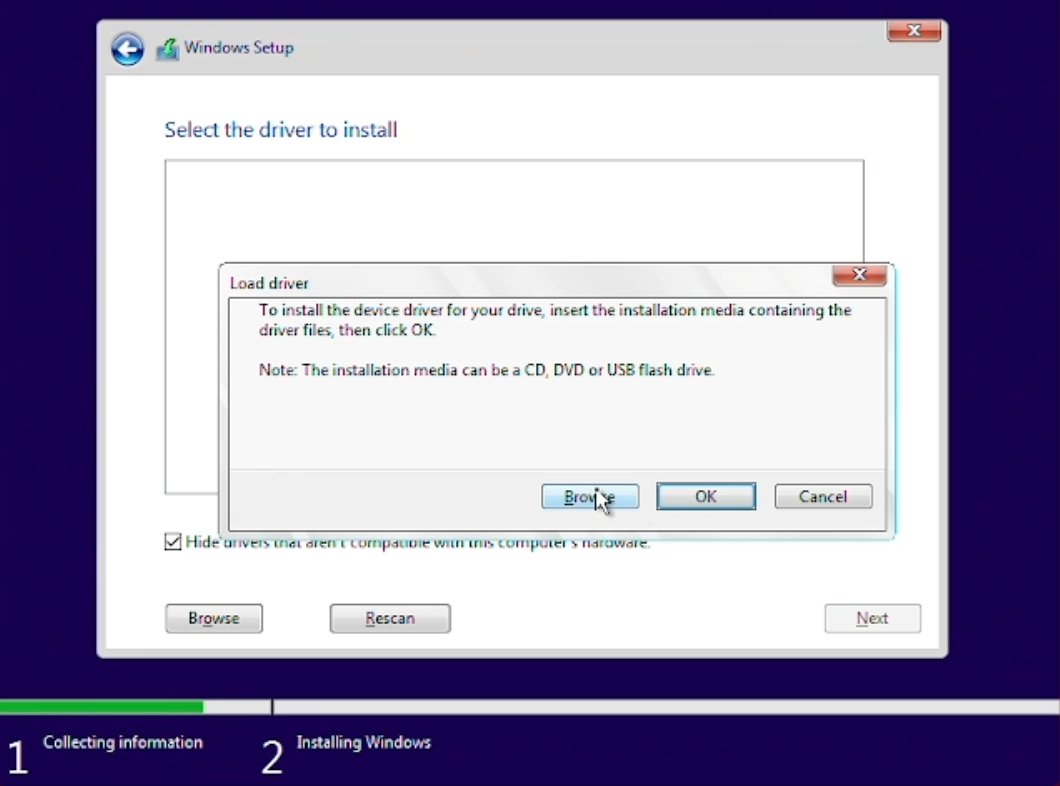

After all drivers have been gathered and installed by the Windows Installation, you will be able to select the drive we created (chapter 3.3) and mounted (chapter 3.2.1) earlier on.
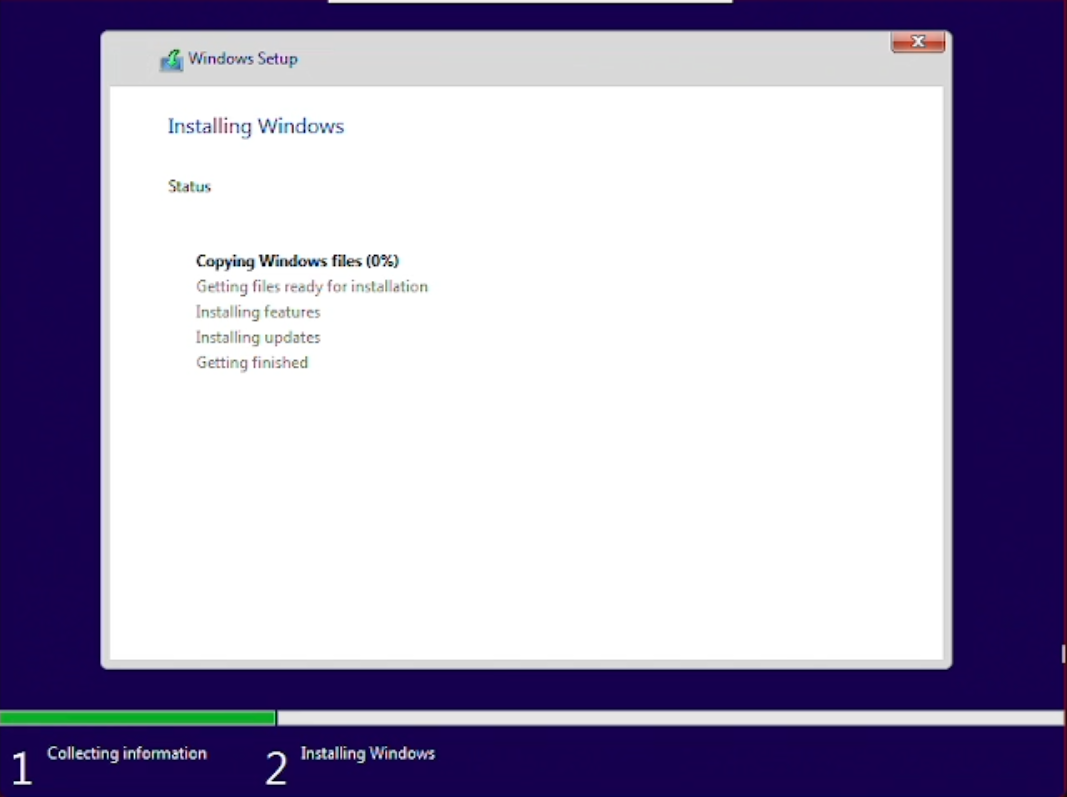
After that’s done the VM will restart, as your PC does too when you install Windows, and automatically enter the final installation steps afterwards.
Here, you’re on your own. This is where you set up Windows Server to your own liking. Not much I can tell you here, that’s on you to decide and do. 😉
7. Wireguard VPN
Being able to connect to our Windows VM via VNC is nice and all, but the performance is kinda..lacking. Plus, always having to portforward 5900 just in order to connect to our VM will become tedious after a while.
Sooooo we’re going to setup a VPN server using Wireguard in Docker in order to provision a client config to both the Windows VM and your local machine at home. Afterwards, we can simply connect to our Windows VM via RDP. Easy!
7.1 Docker
Installing Docker is quite simple, as Docker has taken the time to prepare a script which pretty much does all the important stuff for us. To get it and install Docker, change to your /vms/scripts-directory and run
curl -fsSL https://get.docker.com -o get-docker.sh
sudo sh ./get-docker.sh
This will install all required dependencies, source repositories for apt-usage and the Docker engine on your server. Now, all we need is docker-compose. Run
sudo apt-get install -y docker-compose7.2. Groups (optional)
In oder to run docker and docker-compose commands with your regular, non-root user, you need to be in the docker-group. To add yourself to the docker-group, run
sudo usermod -aG docker <YourUser>7.3 Wireguard-Container
Head on over to your /vms/maschines-directory and create a new directory called wireguard, then switch to said directory.
In said directory, create a new file, using your favourite text-editor, called docker-compose.yml and fill it with the following content:
version: '3.4'
  wireguard:
    image: lscr.io/linuxserver/wireguard:1.0.20210914
    container_name: wireguard
    restart: unless-stopped
    volumes:
      - /vms/machines/wireguard/config:/config
      - /lib/modules:/lib/modules
    cap_add:
      - NET_ADMIN
      - SYS_MODULE
    environment:
      - PUID=1000
      - PGID=1000
      - TZ=Europe/Berlin
      - SERVERURL=auto
      - SERVERPORT=51820
      - PEERS=Win2k22,1,2,3
      - PERSISTENTKEEPALIVE_PEERS=Win2k22
      - PEERDNS=auto
      - INTERNAL_SUBNET=10.10.10.0
      - ALLOWEDIPS=10.10.10.1,10.10.10.0/24
    ports:
      - 51820:51820/udp
For details regarding possible configuration-values and more information about the used docker-image in general, see the Linuxserver GitHub repository.
After you’ve successfully created your docker-compose.yml, validate it using
docker-compose configThe output of that command should look like the following, confirming that your docker-compose-file is valid and ready to use:
services:
  wireguard:
    cap_add:
    - NET_ADMIN
    - SYS_MODULE
    container_name: wireguard
    environment:
      ALLOWEDIPS: 10.10.10.1,10.10.10.0/24
      INTERNAL_SUBNET: 10.10.10.0
      PEERDNS: auto
      PEERS: Win2k22,1,2,3
      PERSISTENTKEEPALIVE_PEERS: Win2k22
      PGID: '1000'
      PUID: '1000'
      SERVERPORT: '51820'
      SERVERURL: auto
      TZ: Europe/Berlin
    image: lscr.io/linuxserver/wireguard:1.0.20210914
    ports:
    - protocol: udp
      published: 51820
      target: 51820
    restart: unless-stopped
    volumes:
    - /vms/machines/wireguard/config:/config:rw
    - /lib/modules:/lib/modules:rw
version: '3.4'
Well then! Time to start your Wireguard container! Whilst still in your /vms/machines/wireguard-directory, run:
docker-compose up -d && docker logs -f wireguarddocker-compose up -d does several things for us.
– It downloads the image specified for the Wireguard-container in the image-section, in our case scr.io/linuxserver/wireguard:1.0.20210914
– It creates the container
– It starts the container
afterwards, we attach to the logs of said container to see whether everything went correctly via docker logs -f wireguard, where the parameter -f just means follow, much like the command tail -f <file>.
If you can see some QR-codes in the logs and entries much like [#] ip -4 route add 10.10.10.3/32 dev wg0
[#] ip -4 route add 10.10.10.2/32 dev wg0
[#] iptables -A FORWARD -i wg0 -j ACCEPT; iptables -A FORWARD -o wg0 -j ACCEPT; iptables -t nat -A POSTROUTING -o eth+ -j MASQUERADE
[ls.io-init] done.
then everything went smoothly and we are ready to roll out Wireguard on our Windows VM and your local machine at home.
7.3 Deploying Wireguard-Clients
Back to your VNC connection to your Windows Server!
Open the file-explorer and browser to your Admin-users Documents-directory. Create a new file called Win2k22.conf and fill it with the contents of the /vms/machines/wireguard/config/peer_Win2k22/peer_Win2k22.conf from your host.
Download and install the Wireguard client (link in the Preface-section from the beginning), run it and add a new tunnel/configuration. In the selection-dialog, browser to your Admin-users Documents-directory and select the previously created Win2k22.conf-file.
Your Wireguard-client should now be able to connect to the recently created Wireguard-VPN with the given configuration. Activate the tunnel! Go on, you know you want to!
8. Remote Desktop
Several things in order to access your Windows Server via RDP:
- In your Windows Servers VNC connection, go to Settings -> Search -> Remote desktop settings and set Enable Remote Desktop to On.
- Copy the contents of the peer-configuration of your choice (other than the one for the Windows Server, duh), generated by your Wireguard-container, to your local machine at home, to your users Documents-directory.
- Install the Wireguard-client (link in the Preface-section from the beginning) on your local machine at home, run it and add a new tunnel/configuration and select the configuration-file from your Documents-directory created in the step above.
- Connect to the VPN from your local machine at home by activating the previously added tunnel/configuration.
So far so good! Now both your Windows Server as well as your local machine at home are in the same VPN and can access each other (in theory, that is. Other than the RDP being active on the Windows Server there isn’t much there yet which could communicate with each other).
On your local machine, open the Remote Desktop Connection-app and enter the VPN-IP of your Windows Server. You can see the VPN-IP of your Windows Server either
– In your Windows Servers Wireguard-client, in the Interface -> Addresses-section (i.e. 10.10.10.2)
– In your Wireguard-containers generated peer-configuration for your Windows Server, in the Interface -> Addresses-section (i.e. 10.10.10.2)
Now, when connecting to the VPN-IP of your Windows Server using Remote Desktop Connection, the credentials dialog should pop up. After entering your credentials, you should be logged out in the VNC-connection, but subsequently logged-in in your RDP-connection.
Voilà! VPN, RDP, Windows Server 2022 set up and accessible!
9. Finishing Touches
Having VMs is nice, but there are a couple of other things we can do and configure to make life a little easier. Such as autostarting VMs, starting VMs on boot of the host, shutting down VMs gracefully when the host shuts down…ya know, the little things.
9.1 Autostarting VMs
Having VMs is nice and all, but may not be of much use when said VMs need to be manually started after the host was shut down or otherwise rendered offline. To have the VM autostart when the host starts, run the following command for each VM:
virsh autostart Win2k22-019.1. Shutting down and rebooting the host
It’s all fine and well that the VM automatically starts when the host is booted up, but so far, we can not guarantee that it gracefully shuts down when the host is shut down, too. To make sure of that, edit /etc/default/libvirt-guests in your favourite text-editor and set the following:
# Customizations for the libvirt-guests.service systemd unit

# URIs to check for running guests
# example: URIS='default xen:///system vbox+tcp://host/system lxc:///system'
#URIS=default

# action taken on host boot
# - start   all guests which were running on shutdown are started on boot
#           regardless on their autostart settings
# - ignore  libvirt-guests init script won't start any guest on boot, however,
#           guests marked as autostart will still be automatically started by
#           libvirtd
ON_BOOT=start

# Number of seconds to wait between each guest start. Set to 0 to allow
# parallel startup.
START_DELAY=5

# action taken on host shutdown
# - suspend   all running guests are suspended using virsh managedsave
# - shutdown  all running guests are asked to shutdown. Please be careful with
#             this settings since there is no way to distinguish between a
#             guest which is stuck or ignores shutdown requests and a guest
#             which just needs a long time to shutdown. When setting
#             ON_SHUTDOWN=shutdown, you must also set SHUTDOWN_TIMEOUT to a
#             value suitable for your guests.
ON_SHUTDOWN=shutdown

# Number of guests will be shutdown concurrently, taking effect when
# "ON_SHUTDOWN" is set to "shutdown". If Set to 0, guests will be shutdown one
# after another. Number of guests on shutdown at any time will not exceed number
# set in this variable.
PARALLEL_SHUTDOWN=10

# Number of seconds we're willing to wait for a guest to shut down. If parallel
# shutdown is enabled, this timeout applies as a timeout for shutting down all
# guests on a single URI defined in the variable URIS. If this is 0, then there
# is no time out (use with caution, as guests might not respond to a shutdown
# request). The default value is 300 seconds (5 minutes).
SHUTDOWN_TIMEOUT=120

# If non-zero, try to bypass the file system cache when saving and
# restoring guests, even though this may give slower operation for
# some file systems.
#BYPASS_CACHE=0

# If non-zero, try to sync guest time on domain resume. Be aware, that
# this requires guest agent with support for time synchronization
# running in the guest. By default, this functionality is turned off.
#SYNC_TIME=1
This ensures our VMs are gracefully shut down when the host shuts down. If a VMs doesn’t manage to shut down after 120 seconds, it is forcefully shut down, i.e. destroyed. A start delay of 5 seconds has been set to prevent putting too much struggle on the host when starting all available VMs. Just a minor precaution.
Fin
Aaaaaaaaaaaaaand that’s it! Over the course of this little guide we’ve set up
– QEMU/KVM
– a network template
– a VM template
– a VM NAT network
– a Windows Server 2022 VM
– a VPN server using Wireguard
Pretty neat, if you ask me!
None of this would’ve been possible without the help of Hellcat and his GitHub repo providing templates and other nice things all around QEMU/KVM.
Be sure to check out the repository, as it also contains scripts which help you set up port forwarding from your host to your VM, in case you want to expose a service running in a VM to the outside-world.
That’s it from me. I hope you enjoyed this little guide and learned as much as possible.
Until next time.
Cheers,
Griefed