Preface
What this post is based on
This post is based on a GitLab, GitLab Runner and NGINX configuration from another post on mine. Please bear in mind that the things explained and listed here may not run on publicly available GitLab runners, for example on GitLab.com.
For details about the configuration of said GitLab and GitLab Runners, see: Dockerized GitLab, custom NGINX, CI/CD, GitLab Pages and more!
What’s going to be covered in this post
This post will give a small and simple example on how to run a GitHub workflow via GitLab’s CI/CD infrastructure in order to update a profile README.md with some fancy shmancy flavour stuff. It should be enough to demonstrate how the system works so you can iterate, expand and improve upon it, in order to do what you may or may not need to do with your projects.
Assuming
This post assumes you have a profile README you are using on GitLab and GitHub, which you want to update on a regular basis, which should display various fancy things.
The juicy bits
GitLab is great and all, and you can do pretty much anything with GitLab’s CI/CD infrastructure and their runners, especially if you host a runner yourself. However, GitHub also has a really solid and great CI/CD system. Said system allows you to make use of so called Actions and those actions can be made by anyone. So, naturally, because there’s tons of different use-cases for tons of different scenarios, the GitHub community made an absolute insane amount of pretty amazing custom-actions which do all kinds of stuff.
We don’t have that on GitLab. That sucks. So….what if we could make use of these GitHub actions and the workflows which make use of them…but on GitLab?
Well, now we can!
The organization by the name of nektos has created a software called act which allows you to do just that: Run your GitHub Actions locally!
We’re not going to be running them locally, on our own machines, though. We’re going to use a GitLab Runner for that.
So, what to we need? Not much, actually:
- a GitHub workflow, stored in
.github/workflows/ - a GitLab CI/CD configuration, stored as
.gitlab-ci.yml - a README.md in the root of the repository
GitHub Workflow
The GitHub workflow determines what actions are going to take place in our repository. For the sake of this post, we are going to be using a simple workflow which
- generates a fancy contribution graph in the form of a svg-file
- gets the last five posted articles/posts from a blog’s RSS feed
- gathers any and all GitHub sponsors your GitHub user
- updates your repository with all changes and additions made
The GitHub Workflow in question, .github/workflows/readme.yml, looks like this:
name: Update README

on:
  workflow_dispatch:

jobs:
  blog:
    runs-on: ubuntu-latest
    name: Fetch and Generate Blog Posts
    steps:
      - name: Checkout
        uses: actions/checkout@v2

      - uses: yoshi389111/github-profile-3d-contrib@0.7.0
        env:
          GITHUB_TOKEN: ${{ secrets.GITHUB_TOKEN }}
          USERNAME: ${{ secrets.GIT_USER }}

      - name: Generate
        uses: sarisia/actions-readme-feed@v1
        with:
          url: 'https://blog.griefed.de/feed'
          file: 'README.md'
          format: '<div align="center">${monthshort} ${02day} - <a href="${url}">${title}</a></div>'

      - name: Add GitHub Sponsors to Readme
        uses: JamesIves/github-sponsors-readme-action@v1.2.1
        with:
          token: ${{ secrets.GITHUB_TOKEN }}

      - name: Push
        run: |
          apt-get update && apt-get install git -y && \
          git config user.name ${{ secrets.GIT_USER }} && \
          git config user.email ${{ secrets.GIT_MAIL }} && \
          git checkout -b master && \
          pwd && ls -ahl && \
          git add . && \
          wait && \
          git status && \
          git commit -m 'Update fancy schmancy blog posts, sponsors and contribution graph' && \
          git push "https://${{ secrets.GIT_USER }}:${{ secrets.GITLAB_TOKEN }}@${{ secrets.CI_SERVER_HOST }}/${{ secrets.GIT_USER }}/${{ secrets.GIT_USER }}.git" --all
-
on: workflow_dispatch:This is important and necessary, as this will be used to trigger the workflow from our GitLab pipeline.
- Secrets:
- GITHUB_TOKEN: A GitHub token with read permission to gather all your contributions across all your repositories and your sponsors
- GIT_USER: Your own username. Contributions are gathered for this user and the commit at the end of the workflow will be made with this user, to a repository with the path
GIT_USER/GIT_USER. The GitHub token must match this user. - GIT_MAIL: The mail address to use in the commit message, along with the
GIT_USER. - GITLAB_TOKEN: GitLab token for the user who owns the repository on GitLab. Required to push the changes from the GitHub workflow to GitLab.
- CI_SERVER_HOST: Predefined CI/CD environment variable from GitLab itself. This reflects the FQDN of the GitLab instance running the CI/CD pipeline and determines where the changes are pushed. In combination with
GIT_USER, this would result in URLs similar togitlab.com/Griefed/Griefed. for example.
- GITHUB_TOKEN: A GitHub token with read permission to gather all your contributions across all your repositories and your sponsors
GitLab CI/CD configuration
Our GitLab pipeline prepares the environment for act to work properly and then runs the GitHub workflow. It also passes very important environment variables to said GitHub workflow in order for said workflow to work properly. These variables are then used by the workflow as ordinary GitHub Secrets, which you may or may not be familiar with if you’ve worked with GitHub before.
So, in short: Our GitLab CI’s only purpose is to run another pipeline inside it, which then, in turn, does what we actually want to do.
Our GitLab CI/CD configuration in question, .gitlab-ci.yml, looks like this:
image: ghcr.io/griefed/gitlab-ci-cd:2.1.0

Update Readme:on-schedule:
  only:
    - schedules
  before_script:
    - |-
      echo "#### Ensuring act-config ####"
      echo "-P ubuntu-latest=catthehacker/ubuntu:act-latest" > ~/.actrc
      echo "-P ubuntu-22.04=catthehacker/ubuntu:act-22.04" >> ~/.actrc
      echo "-P ubuntu-20.04=catthehacker/ubuntu:act-20.04" >> ~/.actrc
      echo "-P ubuntu-18.04=catthehacker/ubuntu:act-18.04" >> ~/.actrc
script:
    - |-
      echo "#### Updating Sponsors and Blog Posts and Contribution Graph ####"
      act -v \
        -s GITHUB_TOKEN=$GITHUB_TOKEN \
        -s GIT_USER=$GIT_USER \
        -s GIT_MAIL=$GIT_MAIL \
        -s GITLAB_TOKEN=$GITLAB_TOKEN \
        -s CI_SERVER_HOST=$CI_SERVER_HOST \
        workflow_dispatch
after_script:
    - |-
      echo "Done."
image: ghcr.io/griefed/gitlab-ci-cd:2.1.0This determines the image used by theUpdate Readme-job and contains the previously mentioned softwareact. The Docker image itself is open source and a mirror of the repository can be found here. Without this image, or a similar one containingact, our pipeline would fail.before_script:Notice the echo to~/.actrcsection where a bunch of Docker images are referenced. This is so act knows which Docker images to use for it’s run of our GitHub workflow. act requires a.actrc-file to be present in the executing users home directory. For more information about the contents and configuration of this file, see nektos/act#first-run and nektos/act#configuration. Without this file, act would wait for user input to decide which image to use. User input is not available in pipelines, soooo, we create this file for it.
Depending on the complexity of your GitHub workflow, you may need a different image here. See the previously linked information about the configuration of act for details.act (...) -s GITHUB_TOKEN=$GITHUB_TOKENand other-sparameters pass the variables we want to use as GitHub secrets to act and therefor our GitHub workflow. Make sure to set these variables, or any other variable you want to use and pass, in the GitLabs repository CI/CD configuration accordingly. Note though, that $CI_SERVER_HOST is one of GitLab’s predefined environment variables which you do not have to take care of. We just need to pass it to our GitHub workflow.
README.md
For the sake of simplicity, I am only going to show an excerpt of the README I used myself. The important bits are still there and you should get the idea.
(...some flavour stuff...)

## <div align="center">📃 Latest Blog Posts 📜</div>

<!-- feed start -->
<!-- feed end -->

<br>

## <div align="center">🌟 Awesome People 🥳</div>

<div align="center">
<!-- sponsors -->
<!-- sponsors -->
</div>

<br>

(...some more flavour stuff...)

<img src="profile-3d-contrib/profile-night-rainbow.svg" width="100%"/>
The excerpt on the left shows three important sections of our README we want to update using a GitHub workflow.
feed startandfeed enddetermines where the blog post links gathered in thesarisia/actions-readme-feed@v1-action will be placed.sponsorsdetermines where your GitHub sponsors, if any, gathered by theJamesIves/github-sponsors-readme-action@v1.2.1-action will be displayed<img src="profile-3d-contrib/profile-night-rainbow.svg" width="100%"/>will display the fancy rainbow-style contribution graph generated by theyoshi389111/github-profile-3d-contrib@0.7.0-action. That action has other styles to offer, so make sure to check them out here.
Scheduling
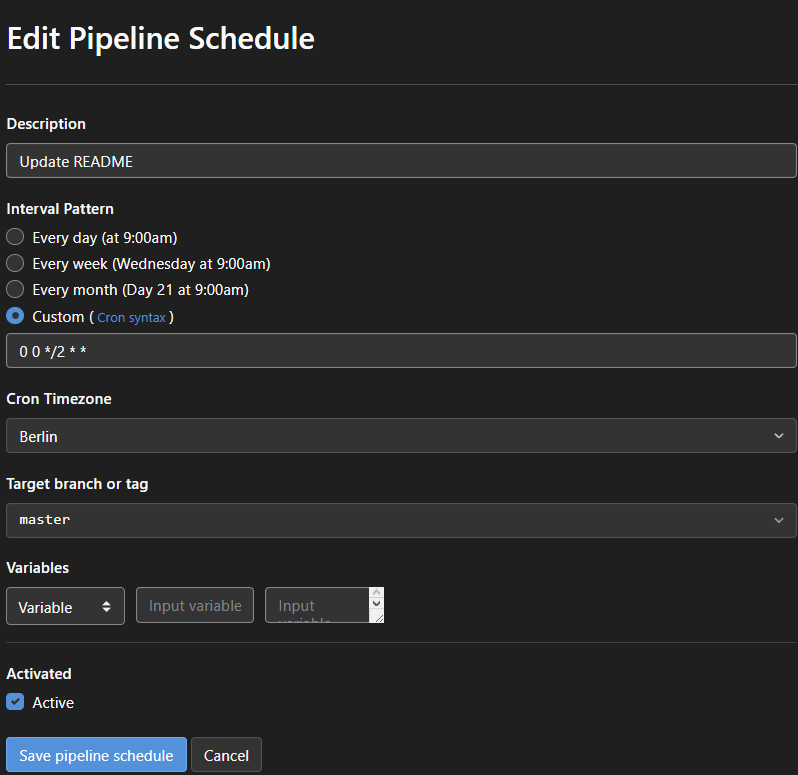
Now that we’ve pretty much set everything up and are ready to go, all we have to do now is to create a schedule so our GitLab pipeline is run in regular intervals. In your GitLabs repository, head on over to CI/CD -> Schedules and hit New schedule.
A simple schedule which is run every two days would look like this:
Now that we’ve pretty much set everything up and are ready to go, all we have to do now is to create a schedule so our GitLab pipeline is run in regular intervals. In your GitLabs repository, head on over to CI/CD -> Schedules and hit New schedule.
A simple schedule which is run every two days would look like the screenshot to the left.
Pretty simple, right?
Done!
And that’s all there is to it! It’s not overly complicated, really.
Some details here and there of which you must make sure they are correct and/or present, but other than that, it is pretty simple.
You’ve now got GitHub Workflows and their actions running on GitLab!
An example of a profile README which makes use of the system above can be found here.
It’s my own profile README, which is updated every two days. Recent blog posts are listed, a fancy rainbow contribution graph is updated and displayed and any and all GitHub sponsors are displayed in my profile README.
Enjoy!